Every October, my kitchen turns into a flour-covered disaster zone. The payoff? Halloween Sugar Cookies that look Pinterest-perfect… if you ignore the chaos behind them. Let’s just say my countertops stay orange and purple until Thanksgiving.
These Halloween Sugar Cookies Decorated with goofy faces are my party favorite. Halloween Royal Icing Cookies shaped like ghosts and bats disappear faster than cake. Kids don’t care about perfect lines—they just want sugar.
I used to dread Halloween Cookies Decorated Royal Icing. My first bats looked like mutant butterflies. But with Easy Halloween Sugar Cookies and a little practice with Halloween Royal Icing, I realized even messy ones taste amazing. Ugly cookies still equal happy eaters.
Now Decorated Halloween Sugar Cookies are tradition. I throw on spooky music, grab cutters, and test new Halloween Cookie Decorating Ideas. Sometimes they shine, sometimes they flop—but Halloween Decorated Cookies always vanish. Because no one ever refuses Ghost Sugar Cookies.

Halloween Royal Icing Cookies
EQUIPMENT (PAID LINKS)
- Oven
- Baking sheets
- Silicone baking mats or parchment paper
- Wax paper
- Electric mixer
- Cookie cutters (pumpkin, ghost, bat)
- Piping bags (tipless or with small round tips)
- Toothpicks or scribe tool
- Edible black marker
- Small food-safe brush
- Cooling racks
Ingredients
Sugar Cookies
- 1 cup unsalted butter softened (2 sticks or 8 oz)
- 1¼ cups granulated sugar
- 1 large egg
- 2 teaspoons vanilla extract
- ⅛ teaspoon baking powder
- ⅛ teaspoon salt
- 3½ cups all-purpose flour
- 2 tablespoons heavy cream
Royal Icing
- 4 cups powdered sugar
- 2 tablespoons meringue powder
- ¼ cup water plus extra teaspoons as needed
- 1 teaspoon light corn syrup optional, for shine and softness
- Gel food coloring in white orange, purple, and black
Optional Decorations
- Candy eyes
- Pink luster dust
Instructions
- Preheat and Prep Pans: Heat oven to 350°F. Line baking sheets with silicone mats or parchment paper.
- Cream Butter and Sugar: In a large bowl, beat the softened butter and sugar with an electric mixer on high speed until fluffy and pale, about 1 minute.
- Mix Egg, Vanilla, and Leavening: In a small bowl, whisk together the egg, vanilla, baking powder, and salt. Add this mixture to the butter-sugar mixture and beat until smooth.
- Add Flour Gradually: Add the flour 1 cup at a time on low speed, scraping the bowl as needed. The dough will look dry at first.
- Bring Dough Together with Cream: Beat in the heavy cream for 10–15 seconds until the dough comes together, soft but not sticky.
- Roll Between Wax Paper: Divide the dough in half. Place one half between two sheets of wax paper and roll to about ¼ inch thick.
- Chill Dough: Place the rolled dough on a baking sheet and freeze for 10–15 minutes until firm but not rock hard. This helps the cookies keep sharp edges.
- Cut Shapes: Cut pumpkins, ghosts, and bats. Place them on the prepared baking sheets, spaced slightly apart.

- Bake Cookies: Bake for 11–14 minutes, until the edges are just beginning to turn light golden. Keep the centers pale for soft cookies.
- Cool Completely: Let cookies cool 5 minutes on the pan, then transfer to cooling racks. Do not decorate until completely cool, at least several hours.
- Make Royal Icing: In a mixing bowl, beat powdered sugar, meringue powder, and ¼ cup water for 2–3 minutes until glossy and thick. If desired, add a teaspoon of corn syrup for shine.
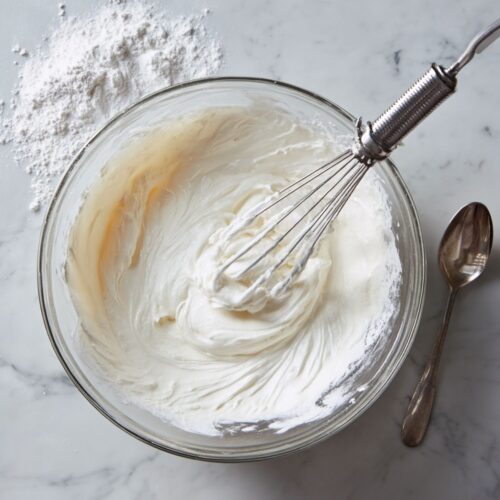
- Adjust Consistency and Color: Divide icing into bowls. Add gel food coloring for white, orange, purple, and black. Thin some icing with extra water for “flood” consistency (flows and spreads smoothly), and keep some thicker for “detail” consistency (holds lines). Add more powdered sugar if it gets too thin.
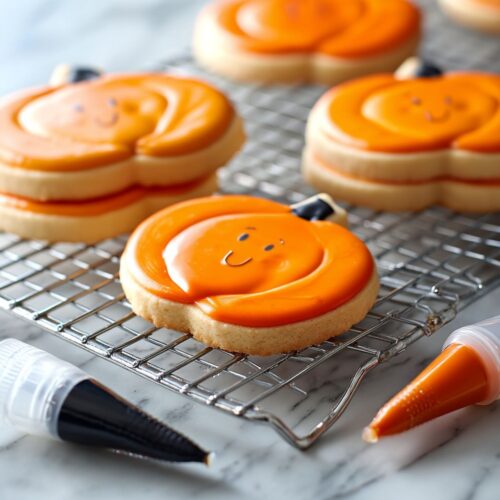
- Decorate Pumpkins: Outline the pumpkin with orange detail icing, leaving space in the middle. Flood the center with orange and smooth with a toothpick. After 10–15 minutes (slightly crusted), flood the side sections. Pipe a black stem. Once fully dry (about 8 hours), add eyes and a smile with an edible marker, plus pink luster dust cheeks if using.
- Decorate Ghosts: Outline with white detail icing, then flood with white. Let dry fully (about 8 hours or overnight). Add eyes, a mouth, and a little “boo!” with an edible marker. Add rosy cheeks with luster dust if desired. For candy eyes, press them into the icing before it dries.
- Decorate Bats: Outline the bat body with purple detail icing and flood. Let it crust for 10–15 minutes, then outline and flood the wings. After fully drying, add eyes and a mouth with an edible marker and highlight wing edges with purple detail icing. Add blush cheeks if desired.
- Dry and Store: Let decorated cookies dry uncovered for at least 8 hours before stacking or storing. Keep in an airtight container up to 5 days, or freeze up to 3 months. For frozen cookies, let them come to room temperature inside the container before opening.
Surviving (and Loving) Halloween Royal Icing Cookies

Chill Out with the Dough
Here’s the truth: if you skip chilling, your cute pumpkins are going to morph into sad, puffy blobs. Toss that rolled dough in the freezer for 10 minutes before cutting shapes. Think of it as Botox for cookies—it keeps everything sharp and lifted.
Butter Drama
Room temperature butter doesn’t mean “microwaved until half-melted.” Been there, done that, ended up with greasy pancake-cookies. If you’re impatient, cube the butter and let it sit out for 15 minutes. Good cookies don’t come from butter soup.
Flour Power
If the dough feels too sticky, sprinkle in a little more flour until it stops clinging to your hands. If it’s too dry, splash in a teaspoon of cream. The dough should feel like Play-Doh, not like something you could mortar a brick wall with.

Lazy Icing Hack
Royal icing takes forever to dry, but here’s the hack: put a fan near your cookies on low speed. Cuts the drying time in half and makes you feel like a baking genius. It’s the closest thing to fast-forwarding your cookies.
Color Outside the Lines
Don’t stress if your pumpkin looks like it was decorated during an earthquake. Flood icing forgives a lot, and edible markers are your secret weapon. Pro move: draw the face on with a marker and pretend you piped it. Nobody will know.
Eye Spy a Shortcut
Skip the fiddly piping of eyeballs. Just stick on candy eyes while the icing is wet. Instant personality, zero effort. Because drawing tiny circles with icing is a one-way ticket to madness.
Storage Secrets
These cookies keep in an airtight container for about 5 days, or you can freeze them for 3 months. Always thaw them inside the container before opening it, or the icing will weep. Nobody wants weepy cookies at a party.
Swap It Like It’s Hot
No meringue powder? No problem. You can use pasteurized egg whites instead, just know the cookies won’t last quite as long. Out of heavy cream? Milk will work, though the cookies might be a little less rich. Basically, your cookies won’t implode if you improvise.